Create an email campaign
Create an email marketing campaign to send your customers marketing for newsletters, new product arrivals, current sales, and so much more.
March 13, 2026🏷️ Marketing email campaigns are unlocked with the Marketing add-on.
⚠️ Important: Email providers are now stricter than ever. It is highly recommended to send by a personalized email domain. This will help ensure your emails are delivered to your customers and not being marked as SPAM.
📖 Learn more: How to set-up a custom email domain in Marsello
Create an email marketing campaign to send your customers marketing for newsletters, new product arrivals, current sales, and so much more.
How do I design my email campaign from scratch?
⚠️Important: All new Marsello users must complete the campaign approval process before sending their first email campaign or automation.
📖 Learn more: Sending your first campaign with Marsello
Create a New Email Campaign
1. In your Marsello admin, go to Marketing > Campaigns > Email. Click Create campaign
💡 Tip: Want to use a pre-designed template? You can choose one during campaign setup. Just click Change Template to browse our email template library.

Design Your Email
2. Build your email layout using the drag-and-drop editor.
-
Choose a content block (like text, image, or button) from the sidebar.
-
Drag it into your email layout.
-
Click the block to edit text, upload images, or change colours and spacing.
-
Rearrange blocks anytime by dragging them to a new spot.

⚠️Important: Auto-Save is off by default. To turn it on, open the Actions menu at the top of your email editor and toggle Auto-Save to On. Once enabled, it will stay on for all future campaigns.

3. Once you have completed your design, click Save & Continue to Settings.

Customize your email template (if using a pre-built template)
🏷️ Email campaign templates are unlocked on the Loyalty Accelerate plan.
Start with a pre-built email template that already includes your branding; logo and social media links. Then, easily customise your email template with simple drag-and-drop content blocks, styling, and more! No digital design knowledge is required.
📝 Note: If your store logo isn't displayed on your email template, you'll need to update your email brand settings. This will automatically populate your logo and social media links on all your marketing email templates.
1. To customise your email template, begin by choosing a content block to drag and drop from the editor into your and click save.

Type of content blocks you can choose from
-
Simple content blocks
-
Columns block
-
Button block - Add a clear, clickable button to your email. It’s a great way to link directly to your online store, a product page, or a special offer. Use it to guide customers to take action quickly and easily.
-
Divider block
-
Heading Block – Personalize your email content and include merge tags such as first name, loyalty points, VIP tier, and unique referral program link.
-
Text block – Personalize your email content and include merge tags such as first name, loyalty points, VIP tier, and unique referral program link.
-
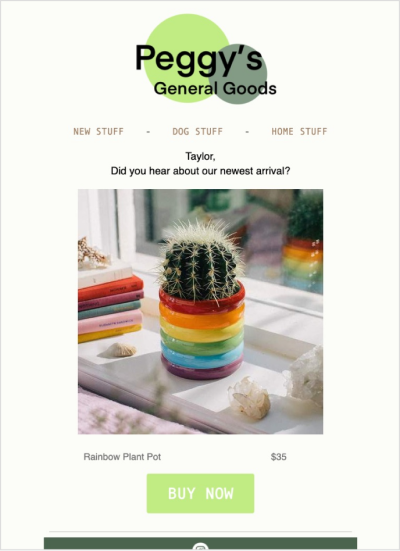
Image block – Add campaign images or product images to your email content. You can also add effects to your images, e.g. text overlay from the block settings.
-
-
Advanced content blocks
-
HTML Block – use HTML code to build your email from scratch
-
Menu Block – add in your store's menu links for easy shopping with minimal clicks required
-
Store Logo block – Auto add your store's logo from your email settings
-
Social Icons – Auto add your store's social media links from your email settings
-
Product block – Showcase a specific product from your store to your email content
-
Video block – Add a video URL to embed a hosted video in your email content
-
Discount block – Add a discount to your campaign to incentivize customers to shop again. This will automatically create discount codes in your store's connections (eCommerce and/or POS) that your customers can use either online or in-store. Please note: Discount codes are unique and can only be used once.
-
Shop Now (eCommerce only) – Link your customers' directly to the home page of your online store
-
Product recommendations block – Increase order value with recommended products for each customer based on their previous purchases and other customers just like them
-
Timer Block – Create a sense of urgency by adding a countdown to an important date like a sale or amount of time left to redeem a discount
-
2. [Optional]. Send a test email. If you want to preview your email campaign before you send, simply:
-
Click Send Preview
-
Enter your email address
-
Click Send Preview

⚠️ Important: Dynamic email content like discounts and product recommendations will not be displayed in test emails. Test emails are designed to preview the design and proofread the content. If you would like to test the full customer experience, you can follow these instructions.
This will send a test of your email campaign to your email address.
3. Click Next Step. This will automatically save your email campaign content ready to send to your customers.
Update your Email Campaign Settings
1. Enter your Campaign name. This campaign name is internal only and is to help you identify your campaign in the Campaigns dashboard.

2. Enter your subject line

💡 Quick tip: Have a clear and concise subject line. Tell your customers why they are receiving the email and the value they'll get from opening it. This will encourage customers to open your emails and read what's inside.
3. Confirm your Sender Name

💡Quick tip: It's important to let your customers know it's you. Include your store's name as your Sender name to help promote customer trust.
4. Confirm your Sender Email Address

💡Quick tip: Set up your custom domain in order to receive your customers' replies.
4. Under Boost Your Campaign:
-
Select the checkbox to automatically resend your campaign to customers who haven't opened the campaign after 48 hours
-
Enter a NEW subject line to re-capture your customers' attention

5. Choose your campaign's audience. Select to send to your entire customer database, or specific customer segment(s). (Sending to specific customer segment(s) is unlocked on the Loyalty Accelerate plan.)
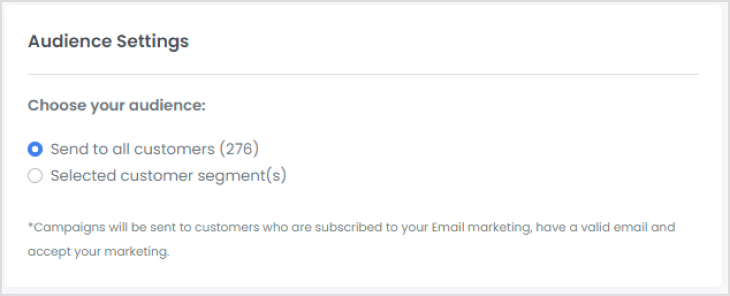
⚠️ Important: Email campaigns will only be sent to customers who are subscribed to your email marketing channel, have a valid email address and accept your marketing.

Review & send (or schedule) your email campaign
1. Review your subject line, Sender name, customers, and segments settings

2. Review your email campaign. Under Preview, Check your email campaign content and look carefully for typos before sending.
3. Choose when to send your email campaign
-
Send now – This will queue your email campaign to send right away.
-
Schedule for later – Choose the date and time that you'd like to send your email campaign.

4. Click Send Now (or Schedule Campaign). This will set up your email campaign to send at your desired time and date.

Understanding your Email Campaigns Analytics
Marsello Analytics dashboards help you track the performance of your marketing over time! These new insights display the revenue generated from your Marsello marketing, whilst also giving an overview of how your email campaigns are performing.
Learn more about your Email Campaigns Analytics

How it works – Your customers' experience
When the customer receives the email campaign, they'll be able to open it and engage with your content, such as:
-
Text block merge tags – This will populate the content specific to the customer e.g. First name = Karen, Points balance = 156, VIP Tier = Gold Star
-
Shop now block – This will lead the customer to the home page of your online store
-
Discount block – The customer will see a Claim Code button which they can click to claim their unique discount code to use on their next purchase.
-
Product recommendations block – The customer will see unique products based on their purchase history and customers just like them.
If the customer decides they no longer want to receive email campaigns from your store, they can click the unsubscribe text link at the bottom of your email. They can then choose the types of emails they would like to unsubscribe from. This will then automatically update their Marsello customer profile and remove email as an available channel to contact the customer.
Brands also searched for: crea, campa, campk, dunamic, sched, sche, reedim,unredeem, unreedee, reedimg, rescche, reschudle, reschedule, resch, reschchedule, unschedule, unsched