-1.svg)
Once your loyalty program is set up, there are a few more steps before it's ready for customers. This guide walks you through everything you need to do to launch.
🏷️ Marsello's loyalty program is available across all pricing plans.
Before you go live
Ensure you have completed the loyalty program setup steps first: choosing how customers earn points, creating rewards, and branding your program. Once that's done, follow the steps below to go live.
Terms you'll see in this guide
- POS (Point of sale) – the system your staff use to take orders and process payments in-store.
- Customer portal – the page where customers sign up, track their points, and redeem rewards.
- Digital wallet pass – a version of a customer's loyalty card that they can save to their phone.
- Loyalty automations – automatic emails sent to customers at key moments, like earning points or unlocking a reward.
Steps to launching your loyalty program
Follow the path that matches how you sell.
If you sell in-store (POS):
If you sell online only:
If you sell in store: Train your staff on how to talk about loyalty
⚠️ Important: This step applies to in-store (POS) selling only. If you sell online only, skip to Step 3.
Make sure your team understands your loyalty program. This helps them confidently mention it at checkout, which boosts sign-ups and engagement.
A simple prompt like "Do you have a reward to redeem today?" encourages customers to join or take part.
📖 Learn more: Staff training guide: How to promote your loyalty program and engage customers at POS
Step 2: you sell instore: Enable loyalty at POS
⚠️ Important: This step applies to in-store (POS) selling only. If you sell online only, skip to Step 3.
If you sell in-store, your staff need Marsello enabled on your point-of-sale (POS) system to access customer loyalty profiles at checkout. This lets you capture in-store orders and give customers a seamless loyalty experience, whether they shop online or in person.
The exact steps depend on which POS system you use:
| Your POS | What you need | Guide |
|---|---|---|
| Shopify POS | The "Marsello: Scan, redeem loyalty rewards" app extension, added as a tile on your sales screen. | Install the app extension |
| Lightspeed Retail (X-Series) – desktop | A Chrome extension. This method is legacy — check with Marsello support about "POS prompts" as the newer option. | Install the Chrome extension |
| Lightspeed Retail (X-Series) – iPad | An iOS extension. Also legacy — same note as above. | Install the iOS extension |
| Lightspeed Retail (X-Series) – POS prompts | The newer, non-legacy method for X-Series. | How POS prompts work at checkout |
| Lightspeed Retail (R-Series) | Marsello added directly to your sales screen. | Add Marsello to your sales screen |
| Lightspeed Restaurant (K-Series) | A web extension added to your POS menu screen. | Add Marsello to your menu screen |
| Lightspeed Restaurant (O-Series) | Your POS sites enabled in Marsello. | Enable your POS sites |
| Cin7 Omni | A Chrome extension. | Install the Chrome extension |
| Heartland Retail POS | Your Heartland account connected to Marsello. | Connect Heartland to Marsello |
| Clover POS (Beta) | Your Clover account connected to Marsello. | Connect Clover to Marsello |
| Windows-based POS | The Universal POS Connector. | Connect via the Universal POS Connector |
Step 3: Activate your loyalty program
At the top of the loyalty program page, switch your program from Disabled to Active. This can be found in your Marsello dashboard under Loyalty > Earning.
Customers can now start earning and redeeming points as soon as you begin promoting your program.
Step 4: Turn on rewards
Make sure each reward you've created is turned on, not just saved as a draft. This is what lets customers actually see the perks you've set up — the reason they'll keep coming back. A reward sitting in your admin unpublished is invisible to customers, no matter how good the offer is.
You'll find this setting under Loyalty > Redeeming.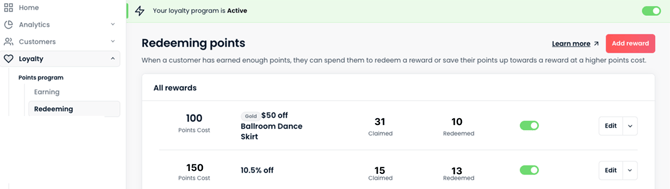
This lets customers see the perks you've set up — the reason they'll keep coming back.
Step 5: Publish your Customer Portal
Publish your Customer Portal. Customers can then sign up, track their points, and redeem rewards wherever they shop with you.
Step 6: Optional: Publish a Digital wallet pass
Digital wallet passes turn a customer's loyalty card into something they carry right on their phone — no app download needed. Once a customer adds their pass, their point balance and reward status update automatically, so they always have their current balance on hand at checkout. You can also send proximity and points-update notifications straight to their phone.
Marsello supports both Apple Wallet and Google Wallet, so customers can add their pass no matter which phone they use.
To turn this on from your Marsello dashboard, go to Customers > Personal device > Digital Pass and click Save changes on the digital wallet pass settings page.
Step 7. Enable loyalty automations
Turn on automatic emails that reach customers at key moments — for example, letting them know when they've earned points, or when they've unlocked a reward they can redeem.
To enable Loyalty automations from your Marsello dashboard, go to Loyalty > Automations.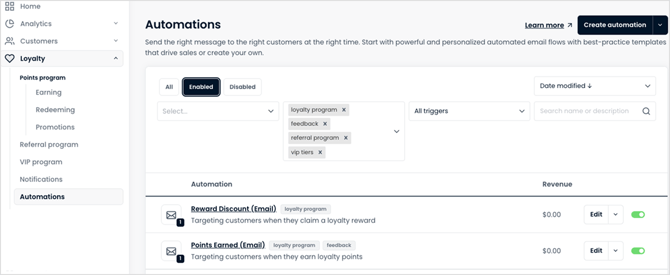
💡 Tip: Start with two automations — one for when a customer earns points, and one for when a customer unlocks a reward.
⚠️ Important: Turn on your loyalty automations after you've activated your loyalty program (Step 3), not before. If automations are switched on too early, customers could receive an email about points or rewards before your program is actually live.
What's next?
Once you've completed all 7 steps, your loyalty program is fully live. Customers can earn and redeem points in-store and online. They can sign up through your Customer Portal and receive automated emails at key moments.