Offering a discount or points as an incentive on your forms can be an effective way to motivate customers to sign up for your marketing.
September 15, 2025
🏷️ Signup forms are unlocked with the Marketing add-on.
Incentive options available for Marsello sign-up forms
Loyalty points
By enabling the Create an account loyalty earn option, you can automatically award loyalty points to new customers when they sign up. This strategy is an excellent way to boost signups for your marketing efforts and drive engagement with your loyalty program
Discount incentive
Offer new sign-ups a discount incentive for joining your marketing list by:
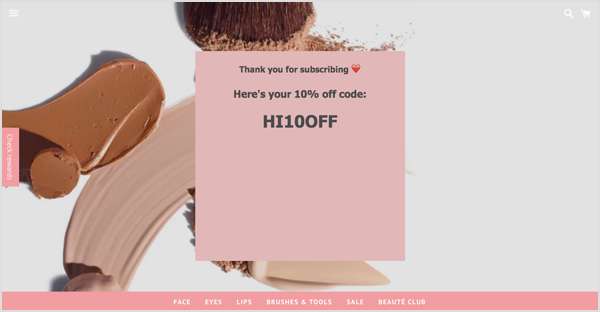
Displaying a Universal Discount Code on Your Form's Success Page
-
To offer this experience, first create a universal or blanket discount code in your sales platform. Once the code is set up, add it to the success page of your sign-up form. All customers who sign up will receive the same discount code.
OR
-
Sending a Unique Marsello Discount Code via Email Automation
For this experience, customize your Welcome or custom automation in either Marsello or Klaviyo, ensuring it includes a discount block. After a customer completes your sign-up form, the automation will trigger at the scheduled time and send the discount code to your customer. The customer will then need to click on the discount block to claim their unique discount code.
💡 Tip: The most common sign-up incentive discount 10% off. Used by brands like H&M, Country Road, Urban Outfitters and more.
Customize your sign-up form to include information about your sign-up incentive
1. In your Marsello dashboard, open the online signup form you wish to edit.
📝Note: If you are creating a form from scratch you can also do this from the Signup forms tab. Click Create form and select the form type you wish to create (landing page, pop-up or link in bio page).
2. Go to the Form customization tab to edit the contents of your sign up form.

3. Edit the text of your form to include your incentive details:
-
the number of loyalty points the customer will receive for creating an account
or
-
the title of your discount

4. [Optional]: Format your Form text toolbar
You can adjust the following settings to better suit your brand:
-
Font
-
Text size
-
Text formatting – Bold, Italics and underline
-
Text alignment – Left, center and right
-
List options – Bullet points or numbered list
-
Text color
-
Text background color
-
Indent options
-
Link – Add a hyperlink to your text
-
Unlink – Unlink your text
5. Once you are happy with your Form design, click Save.
Add an incentive to your sign-up form's success screen
1. Select the success tab of your sign-up form to edit the contents of your form's success page.

2. Click into the text content block to customize the confirmation message that the customer's details have been received and an incentive is on the way.
-
If you are rewarding customers with loyalty points, you can use the text block on this screen to thank them for signing up and that their points for creating an account have been awarded.
-
If you are providing customers with a universal or blanket discount code that you have created in your sales platform, you can add that code to your thank you for signing up message here
-
If you are rewarding customers with a Marsello discount code via the Welcome automation or a custom automation, you can tell the customer to check their inbox for their reward.

💡Tip: If your incentive includes any special terms or conditions (such as usage requirements or an expiration date), it’s a good idea to display them on this page to ensure they are clear to the customer.
3. Review your form page and success page
4. Click Save, then Next Step
5. Click Confirm & Launch your Form
Your customers' experience
Once you've enabled your Form, it will begin to display to your visitors. They will see your discount incentive or account creation loyalty points bonus and join your mailing list by completing the sign-up form.
Form Screen
Visitors must enter their Name and Email address, and then opt-in to your mailing list by clicking the Subscribe button at the bottom of the form.

📝 Note: If the visitor doesn't submit their details, they will not be able to access the offered incentive nor be eligible to receive account creation points.
The visitor will then be added as a customer on your eCommerce (and POS) and into your Marsello list ready to receive your marketing.
Success Screen
Next, the visitor will see your Success screen with their points earned, universal (or blanket) discount code, or notification that their reward is on its way via email.
How to customize your Marsello Welcome automation to send an incentive to new signups
📝 Note: You may also create the welcome automation with a Marsello incentive in Klaviyo.
1. In the Marsello admin, go to Marketing > Marketing automations.

2. In the search box enter "Welcome" to access the Welcome newsletter signup automation.

3. Click Edit to open the automation to begin customization.

4. Click the cog icon to open the Trigger settings. Here you can update:
-
Automation name: Enter/update your automation name
This automation name is internal only and is to help you identify your automation in the Automation admin. -
Trigger – When a customer is created: You can choose to send to all customers who meet this trigger, choose to send to selected segment(s), or create a new segment. The customer can sign up for your marketing via the POS order, eCommerce order, or a form.
-
Exit condition: Exit conditions determine when the customer leaves the automation flow. Select When a customer makes an order or completes the automation flow.

5. [Optional]: Add a delay from when the customer enters the flow to when your first email will be sent. To update your automation's Delay settings, click the pencil icon to update the Delay settings

6. Select how much time to wait before the next email in the flow will send and select Save changes

5. Customize the emails in your automated flow by clicking the pencil icon in the email template

6. Customize your email template by using the drag-and-drop content blocks on the right-hand side to customize the design of the email template.
🎨 There are lots of drag-and-drop content blocks to help design your email.
→ See all email blocks you can add and AI assistance options.
7. By default there is a preset discount block already in your email automation. If you intend to keep this discount, you will only need to update the text block to describe the discount. If you wish to edit the discount block, you will first need to remove the discount block from the email and replace it with a new one.
⚠️ Important: The types of rewards that you can create, depend on the POS and/or eCommerce that you have connected. Learn more.
📖 Learn more: Step-by-step instructions on how to create an email discount.
8. Once you have finished editing your automation, click Save and Return and then Save and Return. You will now be able to enable your automation.
Your customers' experience
When the customer receives the email, they will see the discount offer in your email under the Discount button. Your customers can then easily click through to claim their unique discount code to use on their next purchase.
📝 Note: The discount code is created in your POS and/or eCommerce platform when the customer clicks claim, ready for the customer to use on their next purchase.
Once the customer has received the email, the expiry period on the discount will begin.

Merchants also searched for: scre, adjud, icount, kalv, fomn, lyoa, loiy, fopnt, fopn, pount, popints, feild