Import customers from your old marketing app into Marsello automatically when you connect your POS or eCommerce store.
Updated this week
⚠️ Important: This guide is intended to help you import a customer list that is not already in your POS or online store.
If you are looking to adjust or import customer points balances, please follow the guide How do I migrate my customers' loyalty points to Marsello?
Before you get started
Here are some key details to note about importing your customer database into Marsello:
-
Large lists: If your customer list has more than 1,000 customers, we recommend importing it directly into your POS or online store. This is faster than uploading into Marsello because of system limits.
-
Marketing consent: Only import customers who have agreed to receive marketing from your store.
-
Avoid duplicates: Marsello uses each customer’s email address as their unique ID. Make sure your list is cleaned up and duplicates are merged into a single row.
How should I format my customer list CSV file when preparing for a customer import?
Follow these steps to correctly format your CSV file so your data imports smoothly into Marsello.
1. Export your customer database from your previous loyalty program and save it as a .CSV file.
2. Open the .CSV file in a spreadsheet program (e.g., Excel, Google Sheets).
⚠️ Important: Your file must be formatted as outlined below to ensure a successful import into Marsello.
3. Keep only the following columns and remove all others.
-
First Name (required)
-
Last Name
-
Email Address (required)
-
Points Balance (required — enter
0if not applicable). If you are converting your customers points balances to a new rate add those new points balances here. -
Mobile - Must be a valid mobile number. Include country code, for example, +14165550000. Leave blank if not available.
Your final template should look like this:

4. Save your file as a .CSV file.

What steps are involved in the customer import process?
1. In your Marsello admin, go to Customers. From the drop-down menu next to the Update customer list button, select Import Customers.
|
💡Optional steps:
|
-
Send a copy of the import report
-
Confirm the email address where the import report will be sent. Look under “The report of this import will be sent to this email.”
-
-
Create a new segment from this import
-
Next to “Create a new segment based on tag after import,” you can choose to make a new segment using the tag you entered.
-
-
Reward customers with bonus account creation points
-
Check the box to give “Account Creation” loyalty points to all new customers added by the CSV import. The points given will match the settings in your Loyalty Program.
-
2. Click Upload CSV to start the import
⚠️ Important: By importing customers, you confirm that all newly added customers accept marketing. Remove any customers who do not accept marekting from this file before uploading your .csv.
3. Drag-and-drop your data file into the importer.
4. Select the file from your computer and click open
5. Confirm the Header Row
-
Ensure the first row contains your column headers (e.g.,
Firstname,Lastname,Email,Points). -
Select the header row and click Next.
6. Map Your Columns
-
Match each CSV column to the correct Marsello field.
-
Use the dropdown menus to adjust mappings if needed.
-
Click Next.
7. Verify Data
-
Check that all details are in the correct fields (e.g., first names in First Name, valid emails in Email).
-
Fix any errors in-app within the table or offline by selecting export.
Fix errors in-app
-
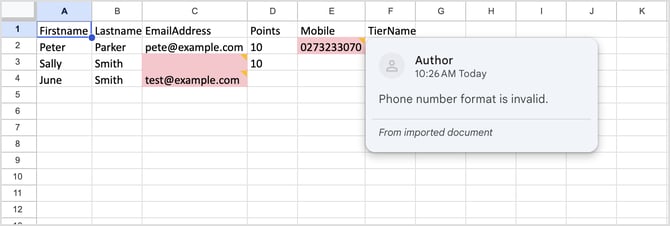
Use the Invalid tab to quickly find issues in-app. Any row that has an error in it will appear in red. Here you will be able to click into the field with the error and make the update.
Fix errors via export
-
Click export to download your data as an xlxs file. Within your downloaded file, any row that has an error in it will appear in red. You will be able to hover over the row to see a detailed description of the error.
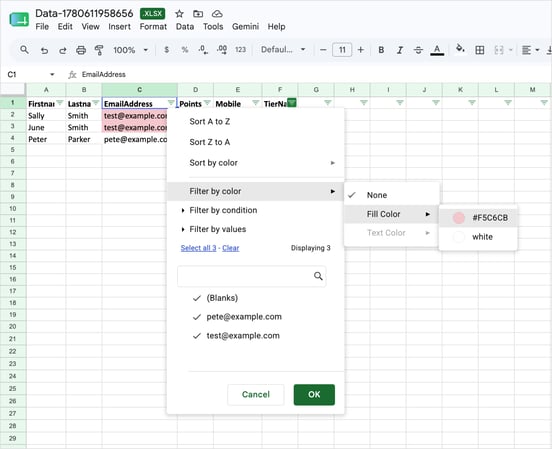
| 💡Quick Tip: Use Excel or upload your file into Google Sheets to f ilter by color in each column to show invalid rows only. Click into each field with the error and make the update. |
- When your file is ready, close the previous import and upload your new file. Complete the upload and mapping steps. This will allow you to cleanly import your updated file.
⚠️ Important: Common invalid row causes:
-
Blank rows
-
First name doesn’t start with a letter or contains symbols (#$^&)
-
Invalid email format
-
Mobile number not starting with
+country code or digits (e.g.,+6127123123or027123123) - Extra whitespaces at the end of the email or mobile number
-
File contains more than 100,000 customers (maximum limit)
-
Remove unwanted entries by clicking the X in the Remove column.
8. Submit Import
-
Click Submit to start importing your CSV file.
-
You will then need to click Upload CSV File on the pop-up that appears after clicking submit to import into Marsello.
⏳ Imports may take up to 24 hours, depending on file size.
Customer import FAQs
Q. I’ve imported my customers into Marsello, but they aren’t showing up in my [POS/eCommerce] connection?A. Customers imported into Marsello don’t sync back to your [POS/eCommerce] connection. You’ll need to import them separately into that platform.
Q. Is there a maximum number of records that can be imported at once?
A. You can import up to 100,000 records at one time. If you need to bring in more, you can split the file into smaller batches.
Q. If I run a customer import including email and mobile that opts the customer into marketing, does this update the customer's marketing status in their integration?
A. No, importing into Marsello won’t update the marketing status in your integration. The integration is the source of truth, so any changes in Marsello will revert to match what’s in your connected system.
Brands also searched for: uplo, impr, Marsl, addingcustomer